How To Use SSH Remote IoT On Mac For Free: A Comprehensive Guide
Are you ready to dive into the world of secure remote connections? Using SSH Remote IoT on Mac for free can open up a whole new level of control over your devices, whether you're managing servers, IoT gadgets, or just tinkering around with tech. This guide will walk you through everything you need to know to get started without breaking the bank. So, buckle up and let’s jump right in!
SSH, or Secure Shell, is more than just a protocol; it's a lifeline for anyone working remotely or managing IoT devices. Imagine being able to securely access your Raspberry Pi or any other IoT gadget from your Mac without paying a dime. Sounds too good to be true? It’s not! With a few simple steps, you can set up SSH and start controlling your devices like a pro.
Before we dive deep into the technicalities, let’s address the elephant in the room: why SSH? Well, it’s all about security, reliability, and ease of use. Unlike other methods, SSH encrypts your data, ensuring that your connection remains private and protected from prying eyes. Plus, it’s free! Who doesn’t love that? So, without further ado, let’s get to it.
- Deep Hot Lonk Unveiling The Hidden Depths Of A Trending Topic
- Emily Compagno The Rising Star Shaping Modern Politics
Understanding SSH and Its Importance in IoT
SSH stands for Secure Shell, and it’s basically a network protocol that lets you access and manage devices remotely over an encrypted connection. When it comes to IoT, SSH is a game-changer because it allows you to securely control smart devices, sensors, and other gadgets without worrying about hackers or data breaches.
Here’s why SSH is crucial for IoT:
- Security: SSH uses encryption to protect your data, making it almost impossible for unauthorized users to intercept your connection.
- Reliability: Once set up, SSH connections are stable and dependable, even over long distances.
- Cost-Effective: You don’t need fancy software or expensive tools to use SSH. It’s built into most modern operating systems, including macOS.
By leveraging SSH, you can remotely manage your IoT devices with confidence, knowing that your data is safe and secure. Now that we’ve covered the basics, let’s move on to the good stuff.
- Alice Rosenblum Leam The Untold Story Youve Been Waiting For
- Alice Roseblum Onlyfans Rising Star Content And Secrets You Need To Know
Setting Up SSH on Your Mac
Mac users are in luck because macOS comes with SSH pre-installed. All you need to do is enable it and configure your settings. Here’s how:
First things first, open up your Terminal app. You can find it by searching in Spotlight or navigating to Applications > Utilities > Terminal. Once you’re there, type in the following command:
ssh -V
This will display the version of SSH installed on your Mac. If everything checks out, you’re good to go. Next, you’ll want to enable remote login. Here’s how:
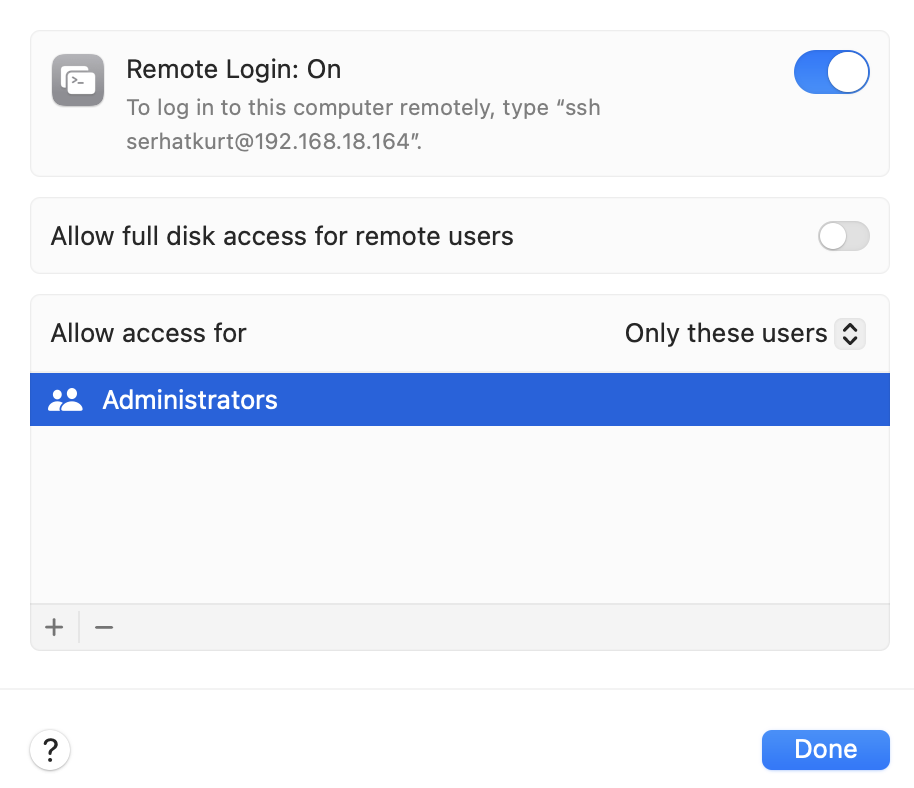
- Go to System Preferences > Sharing.
- Check the box next to "Remote Login."
- Choose who can access your Mac: either all users or specific ones.
That’s it! Your Mac is now ready to receive SSH connections. Pretty straightforward, right?
Connecting to IoT Devices via SSH
Now that your Mac is set up, it’s time to connect to your IoT devices. Whether you’re working with a Raspberry Pi, an Arduino, or any other smart gadget, the process is pretty much the same.
Here’s what you need to do:
- Find the IP address of your IoT device. You can usually find this in the device’s settings or by checking your router.
- Open Terminal on your Mac and type in the following command:
ssh username@ip_address
Replace "username" with the actual username for your device and "ip_address" with the IP address you found earlier. Hit Enter, and you’ll be prompted to enter your password. Once you’re in, you’ll have full control over your IoT device.
Pro Tip: Use SSH Keys for Passwordless Login
Typing in your password every time you connect can get tedious. To make things easier, you can set up SSH keys for passwordless login. Here’s how:
- Generate an SSH key pair by typing the following command in Terminal:
ssh-keygen -t rsa
Follow the prompts to save the key and set a passphrase if desired.
- Copy the public key to your IoT device:
ssh-copy-id username@ip_address
That’s it! From now on, you’ll be able to log in without entering a password.
Best Practices for Using SSH in IoT
While SSH is incredibly powerful, it’s important to follow best practices to ensure your connections remain secure. Here are a few tips:
- Use Strong Passwords: Avoid using common words or phrases as your password. Mix it up with numbers, symbols, and uppercase letters.
- Enable Two-Factor Authentication: Add an extra layer of security by requiring a second form of verification.
- Regularly Update Your Devices: Keep your IoT devices and operating systems up to date to protect against vulnerabilities.
By following these best practices, you can enjoy the benefits of SSH while minimizing the risks.
Common Issues and Troubleshooting
Even the best-laid plans can go awry sometimes. If you’re having trouble connecting via SSH, here are a few common issues and how to fix them:
Problem: Connection Refused
If you’re getting a "Connection refused" error, it could mean that SSH isn’t enabled on your device or the IP address is incorrect. Double-check your settings and make sure everything is configured properly.
Problem: Permission Denied
This usually happens when you’re using the wrong username or password. Double-check your credentials and try again. If you’re using SSH keys, make sure they’re correctly installed on your device.
Still stuck? Don’t worry. Most issues can be resolved with a bit of troubleshooting. Just take a deep breath and work through the problem step by step.
Exploring Advanced SSH Features
Once you’ve mastered the basics, it’s time to explore some advanced SSH features that can take your remote IoT management to the next level.
Port Forwarding
Port forwarding allows you to securely access services running on your IoT devices from anywhere in the world. For example, you could use SSH to access a web server running on your Raspberry Pi.
Here’s how:
ssh -L local_port:localhost:remote_port username@ip_address
Replace "local_port" and "remote_port" with the appropriate port numbers for your setup.
Tunnels
SSH tunnels are another powerful feature that let you securely transfer data between devices. Whether you’re transferring files, streaming media, or accessing databases, SSH tunnels can help you do it safely.
Setting up a tunnel is as simple as adding the "-L" or "-R" flag to your SSH command. Experiment with different configurations to see what works best for your needs.
SSH Alternatives for IoT
While SSH is a fantastic tool, it’s not the only option for remote IoT management. Here are a few alternatives you might want to consider:
- MQTT: A lightweight protocol designed specifically for IoT devices. It’s great for low-bandwidth connections.
- WebSockets: Allows for real-time communication between devices over the web.
- CoAP: A protocol optimized for constrained environments, making it ideal for IoT devices with limited resources.
Each of these alternatives has its own strengths and weaknesses, so choose the one that best fits your needs.
Future Trends in SSH and IoT
The world of SSH and IoT is constantly evolving. As more devices become connected, the demand for secure and reliable remote management solutions will only increase. Here are a few trends to watch:
- Quantum Computing: As quantum computing becomes more mainstream, it could pose a threat to current encryption methods. Researchers are already working on quantum-resistant algorithms to address this issue.
- AI Integration: Artificial intelligence could play a bigger role in IoT management, helping to automate tasks and improve efficiency.
- Edge Computing: By processing data closer to the source, edge computing can reduce latency and improve performance for IoT devices.
Staying up-to-date with these trends will help you stay ahead of the curve and make the most of your SSH and IoT setup.
Conclusion
Using SSH Remote IoT on Mac for free is a powerful way to manage your devices securely and efficiently. By following the steps outlined in this guide, you can set up SSH, connect to your IoT devices, and explore advanced features with confidence.
So, what are you waiting for? Get out there and start tinkering! Don’t forget to share your experiences in the comments below and check out our other articles for more tech tips and tricks. Happy hacking!
Table of Contents
- Understanding SSH and Its Importance in IoT
- Setting Up SSH on Your Mac
- Connecting to IoT Devices via SSH
- Best Practices for Using SSH in IoT
- Common Issues and Troubleshooting
- Exploring Advanced SSH Features
- SSH Alternatives for IoT
- Future Trends in SSH and IoT
- Conclusion


Detail Author:
- Name : Austyn Feil
- Username : jtowne
- Email : laufderhar@hotmail.com
- Birthdate : 1986-05-22
- Address : 4376 Corwin Underpass Gibsonberg, IA 43011
- Phone : +14795174923
- Company : Collins, Batz and Boyle
- Job : Communication Equipment Repairer
- Bio : Ipsam voluptatem aut optio voluptate. Molestias non ratione impedit reprehenderit. Sunt cumque non et quia. Dolorem laudantium illo eum consequuntur consectetur ut.
Socials
linkedin:
- url : https://linkedin.com/in/apfeffer
- username : apfeffer
- bio : Eos eaque in itaque.
- followers : 6587
- following : 1608
tiktok:
- url : https://tiktok.com/@abe.pfeffer
- username : abe.pfeffer
- bio : Perspiciatis doloribus voluptas amet rerum tempora aut molestiae.
- followers : 2764
- following : 841
instagram:
- url : https://instagram.com/abe6665
- username : abe6665
- bio : Eum et nam culpa autem eos non. Minus quisquam et fugit voluptas. Nihil voluptatem omnis velit qui.
- followers : 3187
- following : 1684
facebook:
- url : https://facebook.com/pfeffera
- username : pfeffera
- bio : Aspernatur officiis veniam corrupti cum.
- followers : 2458
- following : 2568
