How To Connect SSH IoT Device Over Internet Without MAC On Windows?
**Listen up, tech enthusiasts! If you're diving into the world of IoT and want to know how to connect SSH IoT devices over the internet without relying on MAC addresses, you're in the right place.** Whether you're working on a home automation project or building a smart device, mastering SSH connections is key. In this guide, we’ll walk you through the process step by step, keeping it simple and actionable. So grab your coffee, and let's get started!
Connecting IoT devices to the internet might sound intimidating at first, but trust me, it's not as complicated as it seems. Especially if you're using Windows as your primary operating system, there are plenty of tools and methods to make this happen without needing a MAC address. This article will cover everything from setting up SSH to troubleshooting common issues. By the end, you'll be a pro at managing remote IoT devices.
Before we dive deeper, let's clarify something: SSH (Secure Shell) is one of the most secure ways to connect to remote devices over the internet. It encrypts all communication between your computer and the IoT device, ensuring no one can snoop on your data. And guess what? You don’t need a MAC address to set this up. We'll show you how to use alternative methods like static IPs, DNS, and port forwarding to establish that connection. Let’s go!
- Somali New Wasmo Telegram Your Ultimate Guide To The Latest Updates
- Alicia Rosenblum Leaked Of The Full Story You Need To Know
Understanding SSH and Its Role in IoT
First things first, let’s break down what SSH really is. SSH, or Secure Shell, is a network protocol designed for secure communication between two devices over an unsecured network. When you're dealing with IoT devices, SSH becomes your best friend because it allows you to remotely control and manage these gadgets from anywhere in the world.
Here’s why SSH is so important:
- It provides end-to-end encryption, protecting your data from prying eyes.
- You can automate tasks, update firmware, and monitor performance without being physically present.
- It works across different platforms, including Windows, Linux, and macOS.
Now, when it comes to IoT devices, SSH helps you manage them efficiently. Imagine having a smart thermostat in your house or a security camera at your office. With SSH, you can tweak settings, check logs, and even troubleshoot problems without leaving your couch.
- Alicia Rosenblum Leaks The Untold Story You Need To Know
- Alice Rosenblum Onlyfans Leaks What You Need To Know And The Truth Behind The Hype
Why Avoid Using MAC Addresses?
Alright, let’s talk about why avoiding MAC addresses is a good idea. While MAC addresses are unique identifiers for network interfaces, they come with their own set of challenges:
- MAC addresses can be spoofed, making them less secure than other methods.
- They’re tied to specific hardware, which means if your device breaks, you’ll lose the connection unless you update the MAC manually.
- Some networks block or restrict access based on MAC addresses, adding unnecessary complexity.
Instead of relying on MAC addresses, we’ll focus on more reliable methods like static IP configurations, dynamic DNS, and port forwarding. These techniques give you greater flexibility and control over your IoT setup.
Setting Up SSH Without MAC on Windows
Now that you know the basics, let’s move on to the practical part—how to connect SSH IoT devices over the internet without using MAC addresses. Follow these steps carefully, and you'll be good to go.
Step 1: Install an SSH Client on Windows
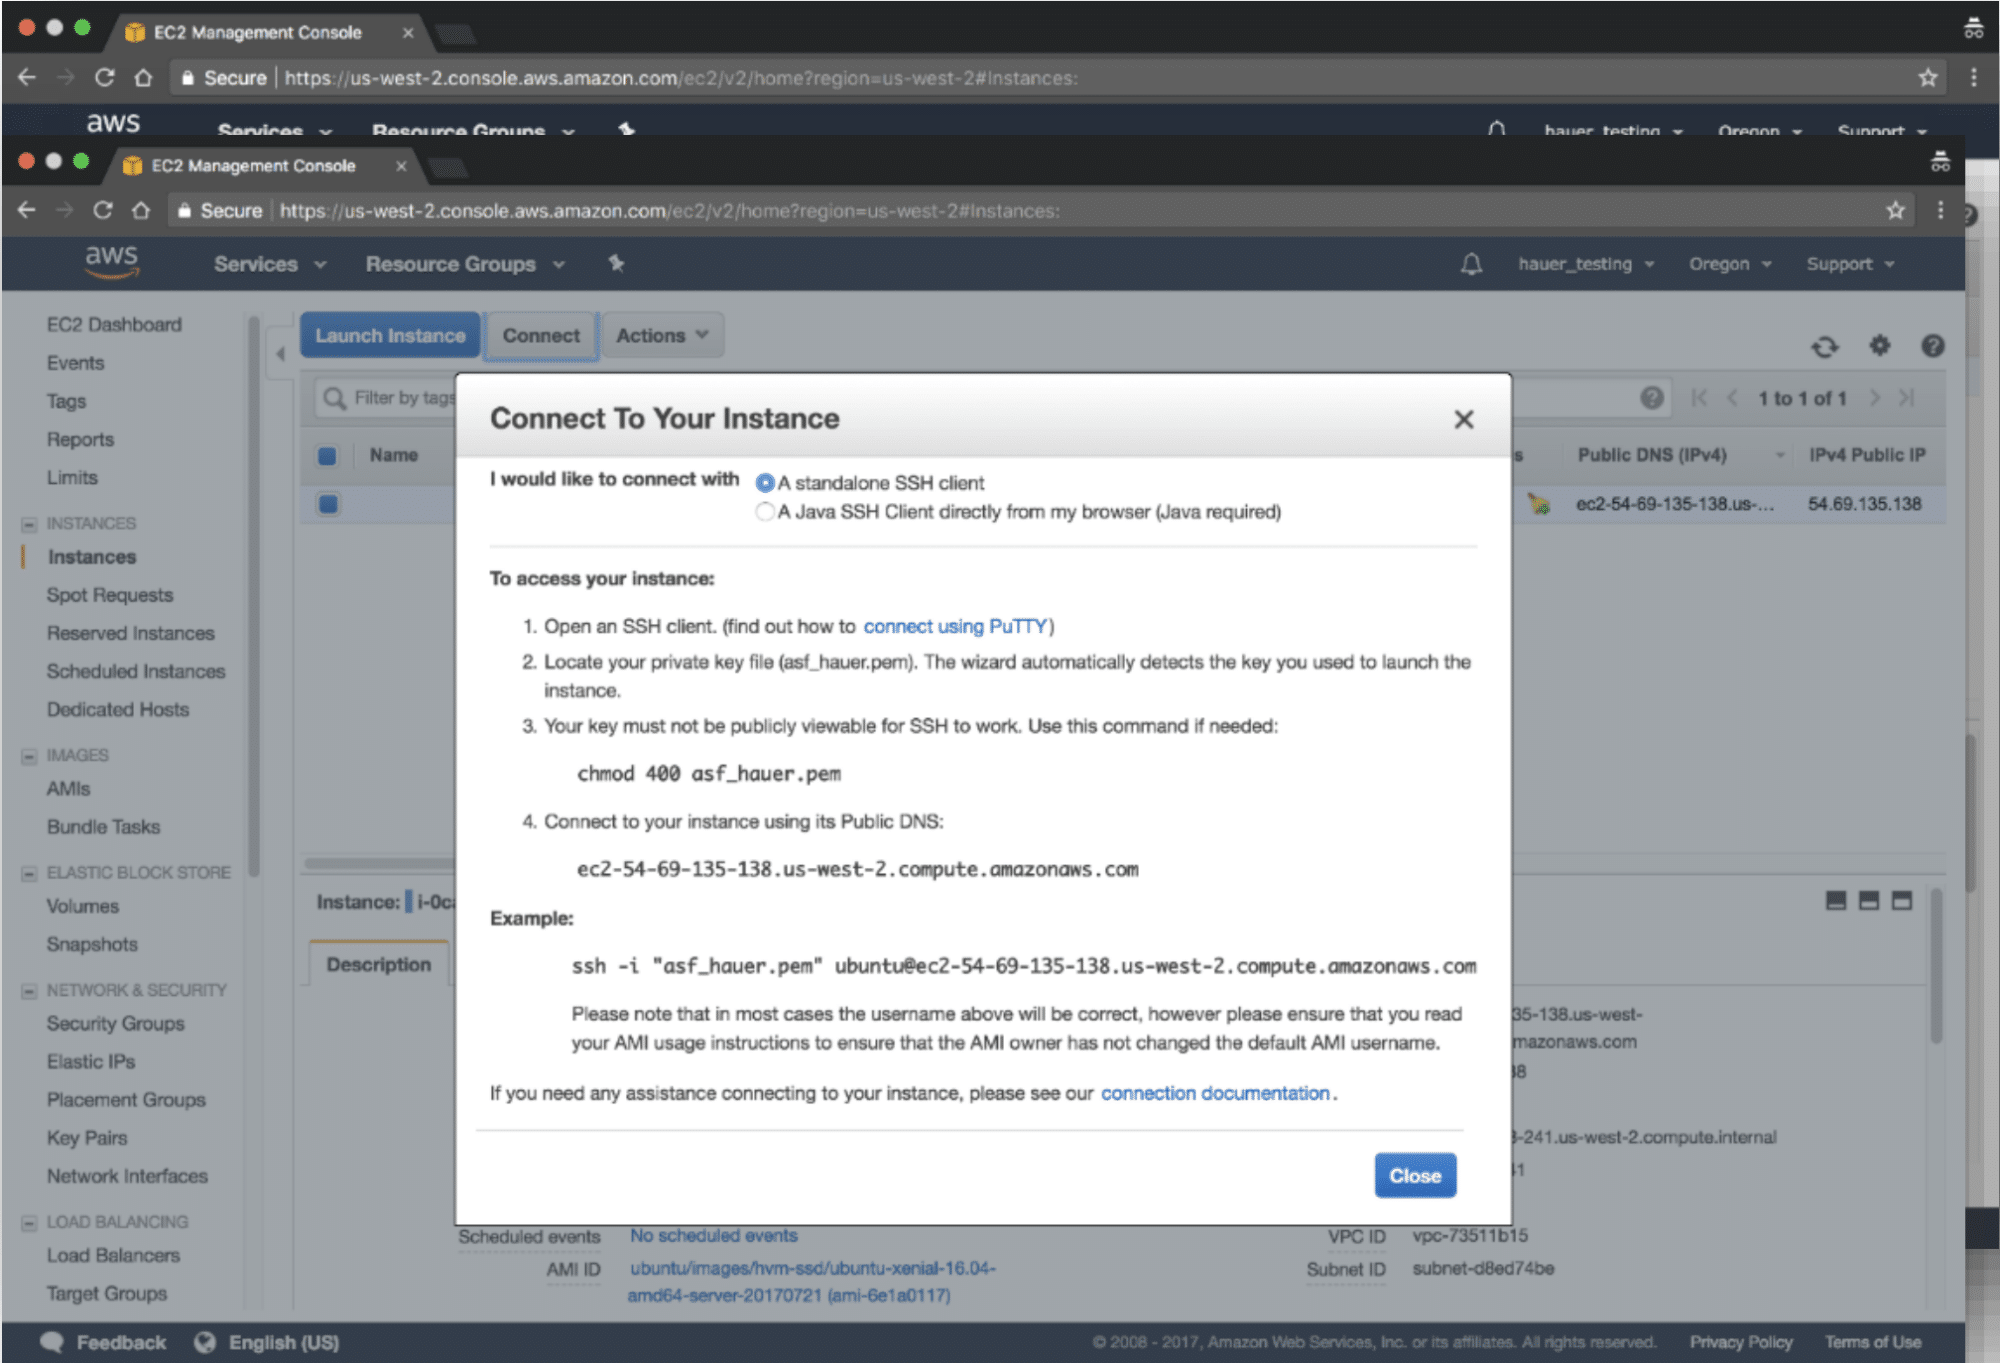
Windows doesn’t come with a built-in SSH client by default (unless you’re using Windows 10 or later). So, the first thing you need to do is install one. The most popular SSH client out there is PuTTY, but you can also use OpenSSH if you prefer.
How to install PuTTY:
- Head over to the official PuTTY website.
- Download the installer and run it on your PC.
- Once installed, launch PuTTY and configure it according to your needs.
Alternatively, if you’re using Windows 10 or later, you can enable the OpenSSH client directly from the Settings menu:
- Go to Settings > Apps > Optional Features.
- Click on "Add a feature" and search for "OpenSSH Client."
- Select it and click Install.
Step 2: Configure Your IoT Device
Next, you’ll need to prepare your IoT device for SSH connections. Here’s what you should do:
- Enable SSH on your device. Most IoT devices have SSH enabled by default, but if yours doesn’t, check the documentation to learn how to turn it on.
- Set a static IP address for your IoT device. This ensures that the device always has the same IP, making it easier to connect.
- Make sure the device is connected to the same local network as your PC.
Pro tip: If your IoT device doesn’t support static IPs, consider using DHCP reservation in your router settings. This assigns a fixed IP address to the device automatically.
Using Port Forwarding for Remote Access
Once your IoT device is ready, it’s time to configure port forwarding on your router. Port forwarding allows you to access your device from outside your local network, giving you full control over it even when you’re miles away.
What Is Port Forwarding?
Port forwarding is a technique where you tell your router to forward incoming traffic on a specific port to a particular device on your network. For example, if you want to access your IoT device via SSH, you can forward port 22 (the default SSH port) to the device’s IP address.
Steps to set up port forwarding:
- Log in to your router’s admin panel. Usually, you can do this by typing the router’s IP address (like 192.168.0.1) into your browser.
- Find the port forwarding section. It might be labeled as "Virtual Servers," "Port Forwarding," or something similar.
- Create a new rule and enter the following details:
- Service Name: SSH
- External Port: 22
- Internal IP Address: The IP address of your IoT device
- Internal Port: 22
- Save the changes and restart your router if necessary.
Dynamic DNS for Easy Access
While port forwarding is great, it still requires you to remember your public IP address. But what happens if your ISP changes it? That’s where dynamic DNS comes in.
What Is Dynamic DNS?
Dynamic DNS (DDNS) is a service that maps your changing public IP address to a static domain name. This way, you can always access your IoT device using a simple URL instead of an IP address.
How to set up DDNS:
- Sign up for a free DDNS service like No-IP or DuckDNS.
- Create a hostname (e.g., myiotdevice.ddns.net).
- Download the DDNS client software and install it on your PC or router.
- Configure the client to update the hostname whenever your public IP changes.
Now, instead of typing a long IP address, you can simply use your hostname to connect to your IoT device.
Securing Your SSH Connection
Security should always be a top priority when working with IoT devices. Here are a few tips to keep your SSH connection safe:
- Change the default SSH port (22) to something less common, like 2222 or 4444. This makes it harder for hackers to guess.
- Use strong passwords or, better yet, set up public-key authentication.
- Enable firewall rules to restrict access to your SSH port.
- Regularly update your IoT device’s firmware to patch any security vulnerabilities.
By following these best practices, you can significantly reduce the risk of unauthorized access to your devices.
Troubleshooting Common Issues
Even with careful planning, things can go wrong. Here are some common issues you might encounter and how to fix them:
- Can’t connect to the device: Double-check the IP address, port number, and firewall settings. Make sure the device is powered on and connected to the network.
- Connection times out: Verify that port forwarding is correctly configured on your router. Also, ensure that your ISP isn’t blocking the SSH port.
- Authentication failed: Confirm that you’re using the correct username and password. If you’re using public-key authentication, make sure the key is properly installed on the device.
If none of these solutions work, try resetting your router or reinstalling the SSH client. Sometimes, a fresh start is all you need.
Advanced Techniques for IoT Management
Once you’ve mastered the basics, you can explore more advanced techniques to manage your IoT devices:
- Script automation: Write scripts to automate repetitive tasks like backups, updates, and monitoring.
- Remote desktop access: Use tools like TeamViewer or VNC to access your IoT device’s graphical interface from anywhere.
- Cloud integration: Connect your IoT devices to cloud platforms like AWS IoT or Google Cloud IoT for enhanced functionality.
These techniques can take your IoT projects to the next level, allowing you to build more complex and feature-rich systems.
Conclusion
Connecting SSH IoT devices over the internet without relying on MAC addresses is totally doable, and with the right tools and techniques, it can be a breeze. By following the steps outlined in this guide, you’ll be able to remotely manage your IoT devices securely and efficiently.
So, what are you waiting for? Dive into your next IoT project and see how far you can push the limits of technology. And don’t forget to share this article with your friends and colleagues who might find it useful. Together, we can build a smarter, more connected world!
Oh, and if you have any questions or run into issues, drop a comment below. I’d be happy to help you out!
Table of Contents
- Understanding SSH and Its Role in IoT
- Why Avoid Using MAC Addresses?
- Setting Up SSH Without MAC on Windows
- Using Port Forwarding for Remote Access
- Dynamic DNS for Easy Access
- Securing Your SSH Connection
- Troubleshooting Common Issues
- Advanced Techniques for IoT Management
- Conclusion

Detail Author:
- Name : Edna Kautzer
- Username : baumbach.sharon
- Email : mcclure.vincent@yahoo.com
- Birthdate : 1987-04-14
- Address : 9240 Jast Junctions Suite 923 South Mabellestad, NH 24630-8611
- Phone : +1 (848) 691-8975
- Company : Marks-Hudson
- Job : Airline Pilot OR Copilot OR Flight Engineer
- Bio : Quas quo quia error voluptatem rerum sed aut sunt. Omnis non consequatur ab labore quod quia. Rerum ab omnis amet. Totam praesentium quaerat ex sunt. Expedita facilis enim quaerat sint cum quo.
Socials
tiktok:
- url : https://tiktok.com/@marlon944
- username : marlon944
- bio : Et nobis non voluptatum distinctio quisquam.
- followers : 4807
- following : 1641
twitter:
- url : https://twitter.com/marlonhaag
- username : marlonhaag
- bio : Sit impedit suscipit voluptatem. Consequuntur quisquam sunt dolorum maiores debitis veritatis.
- followers : 6555
- following : 1565
instagram:
- url : https://instagram.com/marlon67
- username : marlon67
- bio : Vitae qui eaque sed quaerat. Velit consequatur provident cumque dolor officiis suscipit.
- followers : 1972
- following : 1129
facebook:
- url : https://facebook.com/marlon_xx
- username : marlon_xx
- bio : Sed ea consequuntur quis hic officia sed ipsum.
- followers : 6913
- following : 1203
linkedin:
- url : https://linkedin.com/in/marlonhaag
- username : marlonhaag
- bio : Similique sed eligendi sed a animi magni vel.
- followers : 243
- following : 1659
